The Approval process is central to the eProcurement process. It is in every application but is only implemented for those properties who want it. With standard workflow approvals, the system can be configured to copy an organization’s existing approval process. Routing may be required based upon a user’s position ID, spend threshold, departments or GL accounts. With manual approval routing, the user selects the next approver for the document. The history of a document and its approval process provides an audit trail reducing the chance of unauthorized purchases.
There are two methods of approval within eProcurement:
Approval On-the-Fly Approvers are manually selected sequentially. The buyer selects the first approver and subsequent approvers select the next approver. The last approver selects No approver. This ends the process.
Standard Approvals (workflow groups) Approvals are routed through pre-defined groups of one or more approvers. One approver person approves on behalf of the group. The last approver group defined ends the process.
Note: If any one person or group denies approval of the document, the process is ended.
A document can be edited by an Approver using the Edit button in the detail grid on the Approvals tab. When the final approver has approved the document, the status changes to Approved w/changes.
Purchase Type/GL Account
If defined, the Purchase Type defaults an associated GL Account This is defined at either a property or person level and overrides the value of the buyer.
Note: Items from an Order Guide that have specific GL accounts associated with them will NOT be overwritten with the default GL account. Only newly added items will receive the new GL account. Click the Reset Dept/GL Acct # to rewrite the GL Account for all line items.
In each application (RFQ, REQ, PO/CO, AP Invoice, Recipe) there is a choice to implement Approvals or not. Check the box Use approval for [application] checkbox.
Select what approval type the property will use. The options are:
No approval
Approval on the fly
Standard
![]()
Configure the property’s approval routing by defining the group and then the criteria. Open the Workflow Groups Screen from the Main menu.
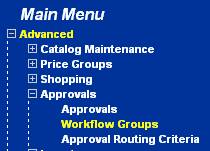
On the Workflow group tab, define Workflow Groups by giving the group a name and description.
Add members to the group by clicking on the Member tab.
Click Add Row to add a new person or position to the group.
Select either Person or Position in the Member type dropdown list.
If Person, zoom to the Person ID lookup and select a person. Click OK to save the row. Click Save to save the record.
If Position, zoom to the Position ID lookup and select a position. Click OK to save the row. Click Save to save the record.
Include as many persons or positions are required for this level of approvals.
Create as many groups as are necessary for the approval processes in all applications. You can reuse groups as many times as you need.

During initial marketplace setup, the Birch Street implementation team often defines the approval routing criteria. Create as many routing criteria records as are necessary to move the approval to the correct approvers.
On the Group routing tab, leave the Routing ID with 0 to allow the autonumber feature to number the record.
Select Approvals in the Routing process dropdown list.
Each process is defined by a Document ID. Enter the correct ID as follows:
15197 = Purchase Order / Change Order
15139 = Request for Quote
15174 = Requisition
20027 = AP Invoice
Enter or zoom to select the Group ID.
Enter a unique, sequential Routing sequence for this group. Example: 100, 200, 300. Additional records can be inserted later if needed.
Enter a Description of this approval route.
Check the Must be approved by all group members checkbox if this is true.
Check the Group can increase quantity if this is true for this group.
Check the Group can decrease quantity if this is true for this group.

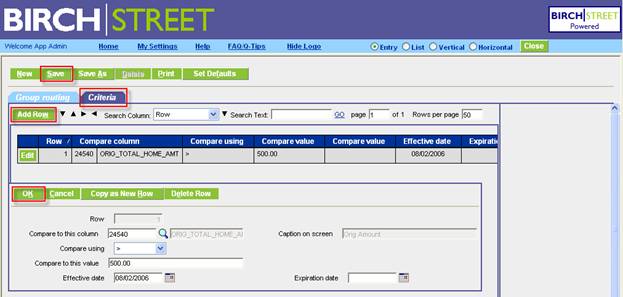
On the Criteria tab, click Add Row to add the criteria for this routing.
Zoom to select Compare to this column. The list is filtered on the document entered on the Group Routing tab. There are many fields on which to compare. For example: If the routing should occur if the amount is greater than a specified figure, then select 24540 = ORIG_TOTAL_HOME_AMT in the PO Header table.
Select the Compare using operator from the dropdown list. For example: >, <, =.
Enter the value on which to make the comparison in Compare to this value. Note: If the value being compared is a value in a dropdown list, it is the value stored in the database not what is displayed on the screen.
Enter the date this rule is effective in Effective date and the Expiration date, if there is one.
Click OK to save the row. Click Save to save the record.
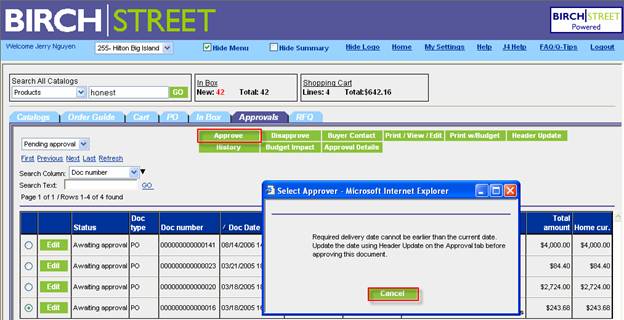
The Required Delivery Date Check for approvals compares the system date against the Required Delivery Date on a PO, REQ, RFQ. If the Required Delivery Date is in the past, the system requires the approver to update it prior to approval.
The approver tried to approve the document where the Required Delivery Date was in the past. Approver needs to modify the date. Click Cancel.
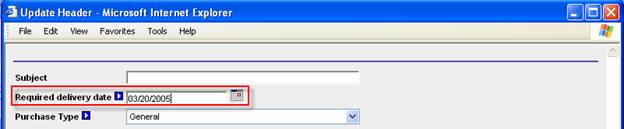
On the Approval front page tab, click Header Update. Modify the Required delivery date to be today or in the future and process the document as normal.
With approval-on-the-fly, it is up to the buyer and approvers to select the correct approvers. However there are additional restrictions that can be added to ensure the necessary approvers are included. The following features can be added and interact together to move the PO through the correct approval path.
All POs/REQs require approval
GL Account requires approval
Use Approval by position
Use Threshold (Check all POs or Check only POs where the GL accounts require approval)
In the Create document window, the No Approver option (doesn’t require approvals) is available for selection when:
All POs/REQs require approval = No
Approval by position = No
Use Threshold = No (or Yes, but it is below the threshold)
GL Account requires approval = No

A property can require that all PO and REQ approvals go through the approval process. Check the All PO’s require approval and/or All REQ’s require approval checkbox in the Company Application Setting Screen.
When the All POs require approval checkbox is selected,
No Approver option is not available forcing the user to select an approver.
With Approval by position also on, then the positions must be satisfied to complete the approval process.
The marketplace can require that all POs with GL Account requiring approvals flag set must go through the approval process. For example: Alcoholic beverages always require approvals but fruit juices don’t.
When Budgeting is turned on, the GL Account requires approval checkbox is selected on the GL account itself, and any one row on the PO uses this GL Account,
No Approver option is not available forcing the user to select an approver.
With Approval by position also on, then the positions must be satisfied to complete the approval process.
A property can require that POs must be approved by certain positions before the approval process is complete.
When the Approval by Position checkbox is selected,
No Approver option is not available forcing the user to select an approver and the positions must be satisfied to complete the approval process.
On the Company Application Setting Screen, on the General tab, check the Use approval by position checkbox to turn on the feature. This will make visible the Required approvers tab.
Click Required approvers tab.
Click Add Row to indicate which positions are required before the PO can be completed in the approval process. Repeat for as many as needed.
Click OK to save the row. Click Save to save the record.
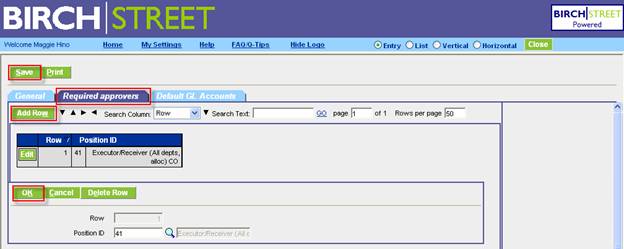
A property can determine who must approve a PO by the approver’s position. At least one person in a defined position(s) must approve the PO to satisfy the approval requirements.

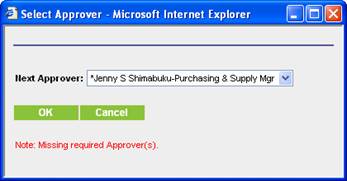
Required approvers are indicated by an asterisk before their name in the Create PO, PO Header Update and the Select Approver window.
If all approvers are not satisfied, there is a message in the Select Approver window alerting the approver that there are missing required approver(s).
In this situation, not all POs, REQs, or RFQs require approvals, so a threshold or boundary is created to determine which documents need approvals and which do not. (Change Order thresholds are handled differently.) There are two elements that are involved:
Monetary amount
GL Accounts require approval flag
When the Use threshold is selected and the threshold amount is exceeded or GL Account require approver flag is yes,
No Approver option is not available forcing the user to select an approver.
With Approval by position also on, then the positions must be satisfied to complete the approval process.
Threshold type. Determine if the threshold feature is used and what type.
Click the Use threshold checkbox to activate the Threshold feature.
Select the Threshold type from the dropdown list.
All POs option will evaluate all POs no matter whether the GL account required approval or not.
POs with approval for GL = Yes option will evaluate only those POs with GL accounts that require approval.

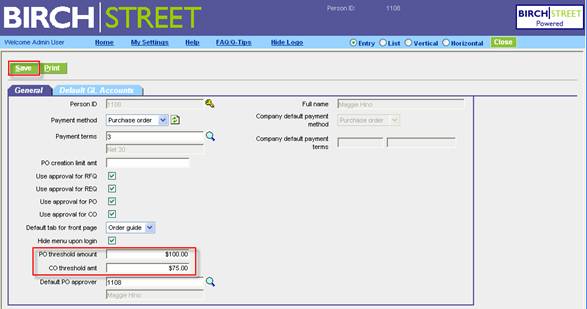
Threshold amount. Determine the threshold amount for each buyer. This determines not only if the document requires approval but to whom it can be sent. In Admin User Application Setting Screen,
Enter the monetary home amount in PO threshold amount.
Note: This amount will be used to evaluate both POs and REQs.
Enter the monetary home amount for the CO threshold amount.
Note: This amount is only used if the CO threshold type is set to Person’s flat threshold amount in Company Application Setting. This will be described later.
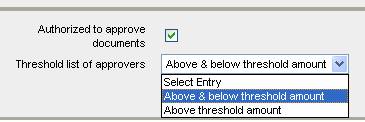
Approver Position. Some approvers have authority to approve PO with a greater value than others and some don’t want to be bothered with approving POs under a certain threshold. Therefore, approvers can be designated as available for POs that are above & below the threshold or above only. Note: Positions are maintained by the marketplace administrator.
Click Authorized to approve documents if the position is allowed to do this.
Select if this position is to be included in the Threshold list of approvers, either Above & below the threshold amount or Above the threshold amount only.
Click Save to save the record.
Once a PO has been submitted to the Supplier, the Supplier can generate a Change Order. If approvals are turned on for CO, there are two options to process it as found in Company Application Setting.
Select from the CO threshold type dropdown list Person’s flat threshold amount. This is used in conjunction with the CO Threshold Amount in Admin User Application Setting Screen.
![]()
Select from the CO threshold type dropdown Company shared percentage. Also enter in the CO threshold %.
![]()
Enter the Default PO approver (also used for Default CO approver). If CO requires approval, it will be sent to this approver.
Check the Notify me when my CO is approved to receive an email notification.
Check the Notify me when my CO is disapproved to receive an email notification.
Click Save to save the record.

A Change Order request arrives from the supplier as indicated by a suffix of –C001.
The buyer reviews the CO request and is in agreement with it. He clicks Accept CO.
The CO is evaluated based on the CO threshold type.
Person’s flat threshold amount. If the person’s defined home amount is exceeded, the CO will be sent to the person’s default PO/CO approver as defined in My Settings Screen.
Company shared percentage. If the company’s defined percentage is exceeded (in home amount), the CO will be sent to the person’s default PO/CO approver as defined in My Settings Screen.
If the CO is sent to the approver, he either approves or rejects the CO in the normal manner.
If the CO does not exceed either the person’s flat threshold amount or the company’s shared percentage amount, then the CO will be accepted and the supplier is send an email notification.