The budgeting feature, also know as a Declining Checkbook, permits the real-time tracking and analysis of a given purchase against a GL account. Access to real-time budget impact analysis is available throughout the buying and approval process.
Budget monies are updated at different times during the PO process: Accept PO, Receiving/ Reconciliation, REQ Fulfillment, and Manual entry (Budget Adjustment). The budget amount is decremented based upon the Required Delivery Date of each document.
In the following situation, the budget is decremented when the Supplier accepts the PO.
On-line Supplier – PO status changes to Accepted by Supplier.
In the following situations, the budget is decremented immediately when buyer Submits the PO:
SOTF/Off-line Supplier – PO status changes to Fax/email/csv accepted
SOTF/Off-line Supplier – Where fax is not processed correctly, the PO status changes to Fax failed connection not made. This allows the PO to be manually re-faxed without decrementing the budget twice.
Punchout Supplier – PO status changes to Accepted by Supplier.
Confirming PO (any type of supplier) – PO status changes to Accepted by Supplier.
During the Receiving/Reconciliation process, budget adjustments are made. The original PO entry is reversed and the new entry is made. The Received date is used to determine the budget period which gets decremented instead of the required delivery date from the original PO. Budget adjustments are also made based upon the Accepted quantity versus the order quantity. You can also reverse the budget completely when using the Cancel PO button which also sets the PO’s status to Buyer Cancelled.
When using the Inventory feature, budgeting is not updated when a PO is accepted by the supplier. It is updated only when the REQ is fulfilled from the storeroom to the outlet (department).
In addition to automatic budget updates, the finance department can make manual adjustment entries.
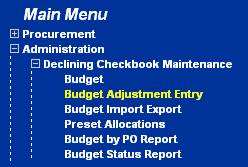
From the Main Menu, click on Budget Adjustment Entry.
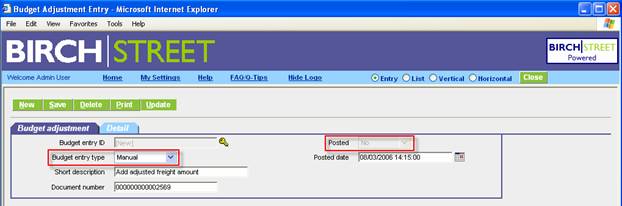
Select Manual from the Budget entry type dropdown list (defaulted).
Notice that the entry has a Posted status of “No.” This will not be updated until the record has been created and the Update button is clicked.
Enter a free form Short description of the transaction.
If this transaction belongs to an existing PO, enter the PO Document number. (Include any prefix or leading zeros. Normally the length is 15.)
Click on the Detail tab to enter the detailed information about this transaction.
Type in or zoom to select the Period number, Department and GL account. These are all required fields.
Type in the monetary adjustment amount (in the Home currency). A positive number increases the expense; a negative number reverses the expense.
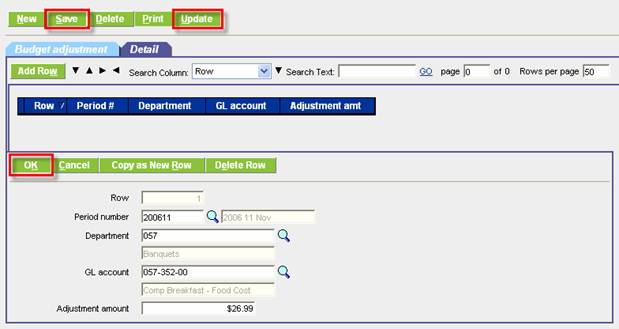
Click OK to save the detail record. Add any additional rows as needed.
Click Save to save the entire adjustment record without posting it. The budget amount is not yet adjusted.
Click Update after the adjustment is made and verified. This will post the record and no further changes can be made. The adjustment record is committed and the budget amount is adjusted.
Budget Impact window is found on the PO tab for the buyer and Approvals tab for the approver.
Click Budget Impact to get real-time budget information to make budgeting decisions. All POs that have started the approval process are taken into consideration for the calculations including the current PO.
Note: Budget Impact is not available for a Storeroom PO. Budget update takes place when the REQ is fulfilled. The Budget Period displayed is based upon the PO’s required delivery date.
View the information in two ways by making a selection from the Department dropdown:
This PO only. View the PO as a stand alone document.

By department. View the PO as a part of all GL accounts within a department.
Note: Only the departments for which the buyer has security access are included in the dropdown list of departments.
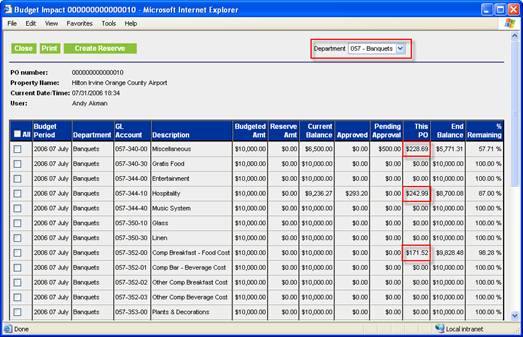
Information about the budget, reserve amount, and POs in the approval process is calculated to display a real-time picture of monies available. Within this window is the Budget Reserve feature that allows the user to “artificially” transfer unused budget from one GL account to another.
This feature allows users with the proper security access to create a Budget Reserve. A Budget Reserve allows the user to “artificially” transfer unused budget from one GL account to another. This allows hotel finance to reallocate funds during purchasing operations in a quick and efficient manner, while at the same time, maintaining the accountability and integrity of the original budget numbers.
Only GL accounts that have a negative balance in the current budget period are available to initiate a Budget Reserve against a separate GL Account.
The Budget Reserve field can be found on the 3 Budget Reports:
Budget by PO Report
Budget Status Report
Budget Rollup (Consumed) Report
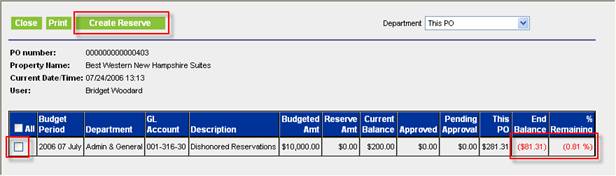
From
either the PO or the Approval Tab access
the button to launch the Budget Impact screen.
On the Budget Impact window, notice that the impact to the selected GL account for the PO’s balance is negative. Only negative balance GL accounts for the current budget period may have a Budget Reserve placed on it. If the user tries to create a reserve against a GL account with a positive End Balance, the system prompts the user with an error. To access the Budget Reserve feature first select the Budget Row with the negative balance and click Create Reserve.
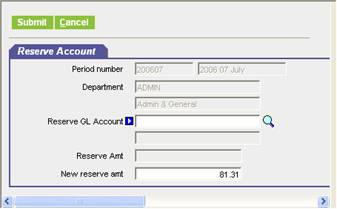
On the Reserve Account screen enter the GL Code of the GL code to “Artificially Transfer the balance to – the “To Account”. The system reads the entire amount of the negative balance, and creates a new “reserve balance” on a separate GL code that will be subtracted from the calculated Current Balance for users who subsequently access any PO’s assigned to the “To Account”. NOTE: No budget is actually ever “moved”. The Budget Reserve’s purpose is to create the illusion that one account is lower to cover actual overages in a different account. Select the Magnifying Glass to access the Zoom to select the “To Account”
On the Reserve Account screen, the “overdrawn” Balance for all rows selected will be added together and defaulted into the New reserved amount field. This amount can be modified. Enter or zoom to select a GL account on which to place this reserve amount. If there is an existing reserve amount, it will be displayed. After the reserve amount has been placed on an account, when the budget impact is next viewed, the Budgeted Amount and Current Balance will be reduced by the reserved amount.
NOTE: No actual budgeted amounts are modified. The Budget Reserve’s purpose is to create the illusion that the budgeted amount is lower for GL Account selected on the Reserve Account screen, to cover actual overages in the GL account(s).
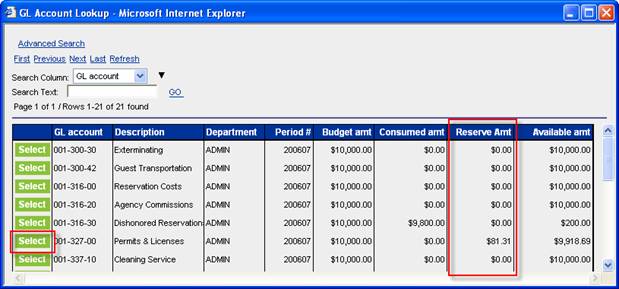
Select the desired GL code from the Zoom window by clicking Select.
NOTE: the column on the right side of the screen, Reserve amt. After a GL code has a reserve placed against it, the column will display that amount for the remainder of the current period. If a GL code has multiple reserves placed against it , the Reserve amt field will display the sum of all reserves placed against it.
The
Reserve Account screen displays the Budget Reserve information.
Any existing reserve for the GL account selected is displayed in the “Reserve
amount” field. The calculated “New reserve amt” may be edited by
the user.
To post the new reserve, select the Submit button.
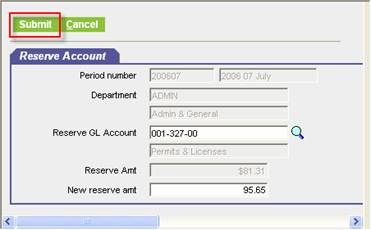
A confirmation box is displayed upon successful submission of the new Budget Reserve request.
From the Main Menu, select Budget.
Find the Period in the navigation list on the left.
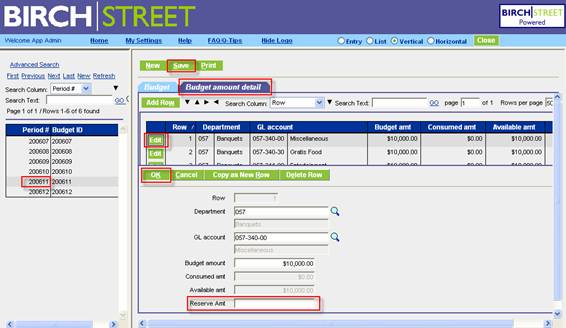
Click on the Budget amount detail tab on the right to display the detail rows.
Click Edit on the specific Department/GL Account on which to place the reserve amount.
Enter the Reserve amount.
Click OK to save the detail row. Click Save to save the entire record.
To Print a Budget Report with Budget
Reserve data, access the Budget Status report from the Main Menu
From the Report Parameter Screen select the appropriate columns and report
parameter filters and click Run. Report results will be displayed.
Period lengths are determined by and defined by Birch Street for the entire marketplace. They are usually the 12 months of the year but could be an annual period for large projects.
Each property defines what are the Budget periods allowed in their property. This normally set up by the Birch Street integration team during original setup.
Each property (company) decides whether to use budgeting or not.
Open the Company Application Setting Screen.
Click on the Use budgeting checkbox to activate this feature.
Type or zoom to select the Default period length code.
Select what to display on the PO Print/View/Edit form from the Show budgeting codes on PO print/view dropdown list. The options are:
Do not show GL Account
Show only GL Account
Show GL Account and Department Description
Show GL Account and Department Code
Show GL Account and GL Description only
Show GL Account/Description and Department code
Show GL Account/Description and Department code and Description
![]()
This is an example of Show GL Account/Description and Department code. The Product Description follows any budgeting information.

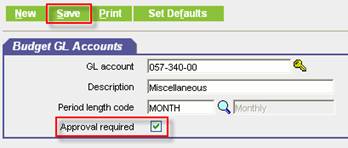
GL Accounts are defined and attached to a Period length. GL Accounts are established by the marketplace administrator.
Note: Check the Approval required checkbox if this GL is required to go through approvals. Leave it unchecked for other approval criteria to take effect.
Update budget information in the entry screen if there are only one or two edits to make. To enter bulk entries, us the Budget Import/Export feature.
From the Main Menu, select Budget.
Find the Period in the navigation list on the left.
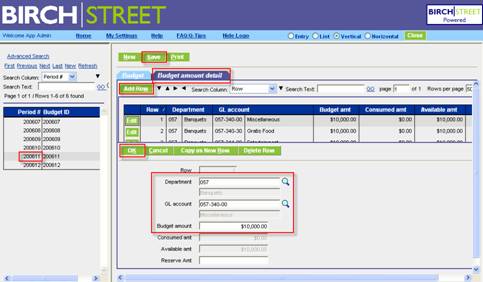
Click on the Budget amount detail tab on the right to display the detail rows.
Click Add Row to add a new Department/GL Account budget amount.
Click OK to save the detail row. Click Save to save the entire record.
-- or --
Click Edit on the specific Department/GL Account on which to edit.
Modify the Department, GL account or Budget amount.
Click OK to save the detail row. Click Save to save the entire record.
Note: The budgeted amount is only a guideline. The buyer can use more than the budgeted amount and use more than is budgeted. If the budget amount is zero but the Department/GL Account is defined, the account can be used.
To facilitate bulk import of budget entries, use the budget import / export.
From the Main menu, go to
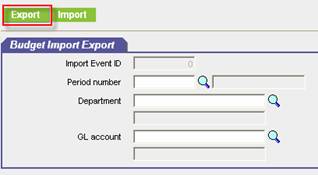
Administration > Declining Checkbook Maintenance > Budget Import Export.
Click Export to retrieve the budgeting template.
Note: In order to fill in the proper information into the template, zoom to Period number, Department or GL accounts to view valid values to insert into the template. There is no entry on this screen. It is only used to export or import the template and to get valid values for the template.
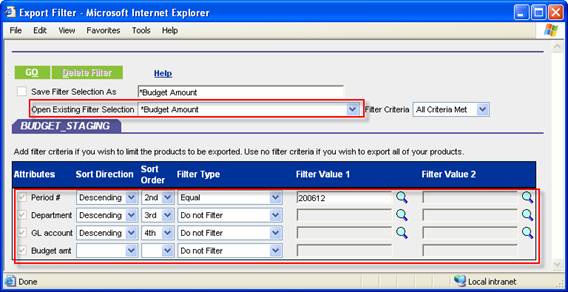
Click on the Open Existing Filter Selection dropdown box and select the *Budget Amount filter.
Enter and filtering criteria below.
Click GO.
Save the template to the desktop, or somewhere where you will remember. Complete the standard procedures for saving a file.

Open the template in Microsoft Excel for editing.
Do not change the first three rows in the template in any way.
Enter a valid value for the period number. Note: Only select periods found in the property’s period length as defined in Company Application Setting.
Enter a valid value for the Department code. Prefix it with # (so that leading zeros are not lost).
Enter a valid value for the GL account. Prefix it with #.
Enter the Budget amount for the Department/GL account combination. The amount must be 0 or a positive amount.

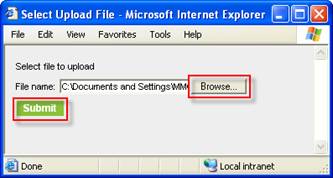
Click Import to open the Select Upload File window.
Click Browse to select the completed Budget template.
Click Submit to upload the file to the eProcurement system.
Note: All uploaded files are ready for use the next day after upload.