Supplier Catalog Item Maintenance
Overview
To ease the burden of catalog item maintenance, eProcurement allows
one item to be used by all buyers. Suppliers do not have to maintain multiple
copies of an item to present differing prices to different buyers. Once
an item is set up for the first time, price updates can be done as often
as the price changes.
A catalog item requires various elements before it can be seen by a
buyer.
Marketplace Administrator responsibilities
Main Marketplace
Catalog – A main catalog for the marketplace.
Catalog Categories
– Available categories in the marketplace.
Catalog Exposure
– A definition to expose your catalog items to the correct buyers.
Price Groups –
Exposes the same item with different pricing to the buyers (if needed).
Supplier responsibilities
Catalog Item
– The supplier uploads his initial catalog using a template provided by
the eProcurement system. It includes various
components:
General information
about the item (Supplier SKU, Description, UOM, Manufacturer, etc.)
Item Price – the
item’s base price. After the initial upload, the price alone can be updated.
Volume Price Breaks
– The supplier can enter up to two additional tiers of price breaks for
an item.
Modifications can be made for a single
item using the Catalog Item Screen.
Catalog Item Categorization
– The supplier must enter a category for the item when it is initially
added to the marketplace. It can be manually changed or added thereafter
using the Item Categorization Screen. Note: Items that are
not categorized will not be visible to the buyer.
Import Timing
Once you have created/modified your Excel Worksheet Template with catalog
product data, and imported it back to the eProcurement system, it will
be automatically processed. Changes imported before 11:00 PM PST will
be processed that evening and be available in the system the next day.
Note: If you are a Price Regulated
supplier, the prices must first be accepted by the Marketplace Administrator.
The file you import must maintain the same column structure as the exported
file. This file will have the .CSV file extension. (CSV stands
for Comma Separated Values.)
Export / Import Items (Initial and Update)
Export the template
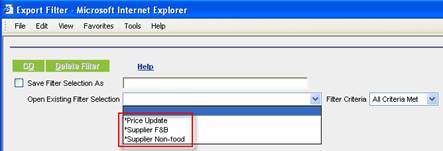
Select
Export from the Catalogs tab.

Select
the appropriate filter from the Existing Filter Selection dropdown list.
Several system-provided Filter Selections are available in the drop down.
Each Filter Selection exports a different combination of product attributes.
*Price
Update – Updates just the item price. It includes additional information
to identify the item. Do not use this filter when you need to add
new items to your catalog.
*Supplier
F&B – Updates food & beverage items with additional fields
for catch weight items. Updates existing item’s pricing as well as adding
new items.
*Supplier
Non-food – Updates non-food items. Updates existing item’s pricing
as well as adding new items.
When you select the Filter the screen
will list the attributes that the chosen filter includes. The attribute
names will be listed on the left side of the page. All attributes are
selected and disabled. To the right of each attribute are filter values
allowing you to limit and sort the exported product data.
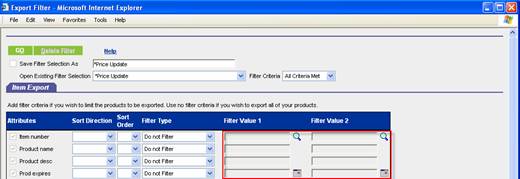
Note: To
export all your products leave the filter values blank.
Note: Before
you launch the export please note the Filter Selection you are using.
You will need to choose this filter selection when uploading the file
so that the system knows how to process your file.
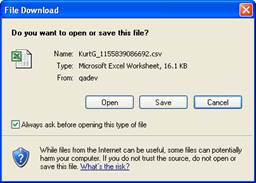
Click GO to launch
the export. The file will be downloaded to your computer
and you should receive a message asking if you want to save it to your
computer or open it. Choose Save and then find a location
on your computer to store the file.
Open the file in Excel. You
may want to widen the column widths to see the data and column headers.
The first three rows contain system information that must be maintained
for the file to be properly uploaded.
CAUTION:
Do not ADD, DELETE, or MOVE columns. The columns have to be imported
back into the system in the same order in which were they were exported.
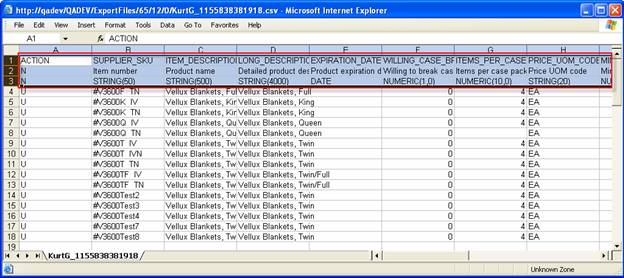
The data can be edited directly in Excel.
The following are selected columns that require special handling:
Action
– Valid values are “U” to Update Existing Records, “I” to Insert as
a New Record.
Item
Number – This is your Item or Product Number or SKU.
Note:
It must be prefixed with a “#” sign. This is to allow Item numbers
that have leading zeros to be correctly entered and edited in Excel.
Without this prefix, Excel will remove the leading zeros corrupting your
item number. All Supplier item numbers imported via Excel must have this
‘#’ symbol prefix. (This is for processing only and is not displayed to
the buyers during the procurement process.)
Mfg
Prod # – This is handled in the same way as item number; with
a leading “#” symbol to account for numbers with leading zeros.
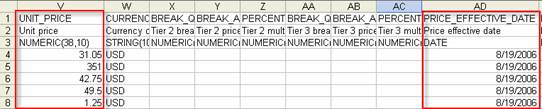
Unit
Price – eProcurement allows you to load new prices for your products
into the system. It also allows you to determine when a new price
will become effective. For example, if you wish to change the price
to $10 and you want that change to be effective on 2/5/2007 you would
change the Unit price to 10.00 and set the price effective date to 2/5/2007.
If you would like the price change to be effective immediately you can
set the effective price date to today.
Note:
If you do not change the price effective date the system will compare
the existing price to the new price and if they are different change the
price effective date to today’s date. The system does not allow
prices with the same effective date. The unit price and Price effective
date columns are highlighted below:
Price
Break columns – Enter two of the three columns: quantity and amount
or multiplier.
BREAK_QTY
Enter the quantity of items to offer this reduction in price.
BREAK_AMT
Enter the monetary flat amount of the price of the item.
PERCENT_BREAK_MULTIPLIER
Enter what to multiply the original price by to get the new price.
Example:
|
Original Price |
Quantity |
Flat Break Amount |
% Multiplier |
Total Price per each |
|
13.88 |
15 |
13.25 |
|
13.25 |
|
13.88 |
25 |
|
0.95 |
13.1896 |
|
13.88 |
50 |
|
0.85 |
11.8012 |
|
13.88 |
75 |
|
0.75 |
10.4128 |
WILLING_CASE_BREAK
Willing to break case – Defaults to 0 = No. Change this to 1
= Yes if your price uom code is LBS or CS. Then enter the CASE_WEIGHT
Avg weight per case in lb (pounds) value and the ITEMS_PER_CASE
Items per case pack value for the system to calculate the price multipliers
for selling the item by the pound, case, and piece.
Note:
If you would like to change an item from "Willing to break case"
to "Not willing to break case," you should not use the Import
process. It should be done manually by loading the item in Catalog
Item Screen and saving the record. This will update the Item
UOM information and remove the system created pound, case, and piece multipliers.
Before saving the file you should delete any extra
rows that you do not want changed. You should only
import records that you intend to change. By removing
records and blanking cells that you do not intend to change you will reduce
the chance of an error or of an unintended data change. Do not remove
the first three rows and do not remove any columns.
After editing, save the file from within Excel.
Make sure it is saved in the CSV format. Excel
may display a warning stating that the file contains features not compatible
with CSV. This is OK. Click Yes to save the file in the CSV format.

Import the Template
Select Import from the Catalogs tab.

Then select the type of file to upload. This must
be the same as was originally exported.

Select Browse and find the file on your
computer. Select the CSV file you want to import and
select Open. A message will display indicating
that the file was uploaded successfully. Click OK.
The data changes will be processed that evening and available in
the system the next day.
Filtering Export Data
The export parameter screen allows you to limit and sort the rows that
are exported so that you can work on just the data you are interested
in. By using the filter controls you can limit the export to only
the products that need to be changed. The fewer products exported
the faster the export will function and the less data you will need to
manage during the editing process.
See the help on Reporting to fill out the parameter screen.

Creating Your Own Filter Selections
If you find that you use the same filter criteria and filter values
repeatedly then you may want to save your criteria in your own Filter
Selection.
Enter your filter selection values and types.
Type a name for your filter selection into the
Save Filter Selection As text box.
Click on the associated check box.
Launch your export by clicking on GO.
When your filter is run, it will also be saved. The next time you return
to this screen your Filter Selection will be included in the list of available
Filter Selections.
Item Categorization
Item categorization refers to how an item is placed in the category
tree structure. A buyer can do a word search for the item or walk down
the path to find an item in a particular category. The supplier is
responsible to make sure the item is in the correct category.
Initial Template Upload
An item must be categorized when it is first uploaded to the system.
Since an item is created only once, the system will automatically create
the item categorization record. After the initial upload, categorization
must be done manually.


Update with Entry Screen
Open the Item Categorization Screen. Advanced
> Catalog maintenance > Item Categorization.
The Item Category ID will automatically
be numbered.
Enter or zoom to select the main Catalog.
Normally there is one main catalog per marketplace.
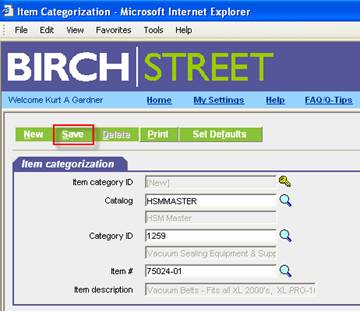
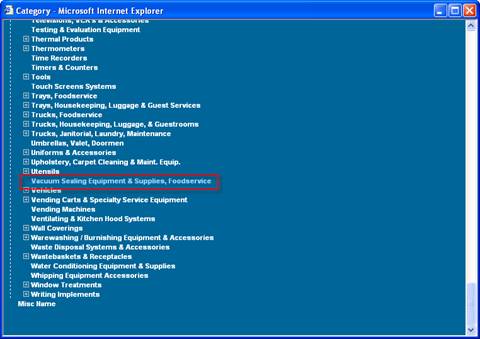
Enter or zoom to select the Category. If
you zoom, find the category you want to place the item in by single clicking
within the tree structure. Double click to select the category.
Enter or zoom to select the Item #. This
is the Supplier SKU. The Item description will be displayed to
verify that the correct item was entered.
Click Save to save the record.
Note: New item categorization is processed
when the rest of the catalog processing is done at night. Any changes
made before 11:00 PM PST will be available the next day.
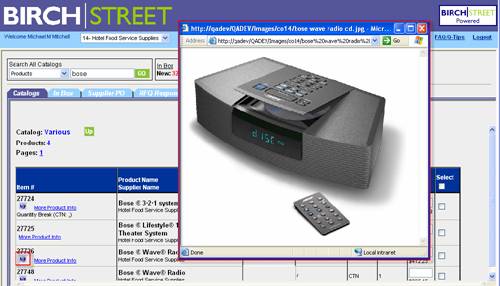
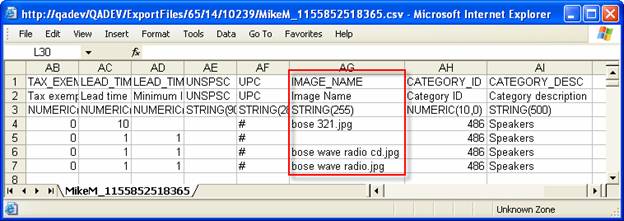
Item Images
Images can be displayed for an item to the buyers. As a supplier, you
can see the results of an image added to an item. Click on the Computer
monitor icon next to the SKU number to open the image window.
Submit Images to Birch Street
Before an image can be linked to an item, actual physical files must
be given to Birch Street. They can be submitted on a CD or placed on an
FTP site. Contact Birch Street for the best manner of transmitting the
image files. They can either be .gif or .jpg file types.
Initial Template Upload
An item can be added when it is first uploaded to the system. It can
also be added during a template update. Enter the value in the Image
Name column such as bose 321.gif. Image names are case sensitive
so make sure you type the name exactly as it was saved on the CD.
Note: Leave the column blank if there
is no image. The presence of a value in this column makes the computer
monitor icon visible for the buyer to click on even if there is no
physical image available.
To remove an image, use the Catalog Item Screen as described
below. You cannot replace blank when there is already something in the
template.
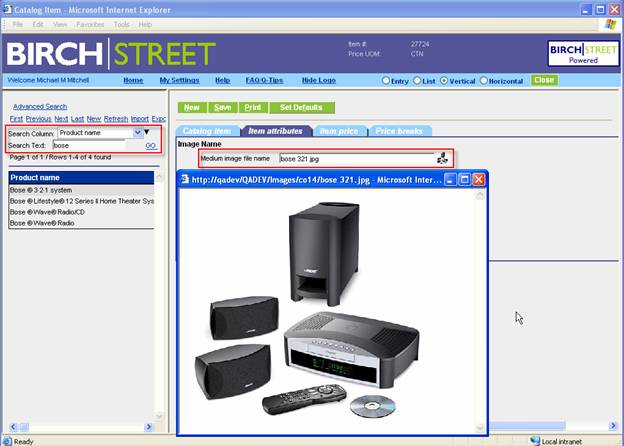
Update with Entry Screen
Open the Catalog Item Screen. Advanced
> Catalog maintenance > Catalog Item.
Load the record using the search from the navigation
list.
Click on the Item attributes tab.
Enter the name of the image file exactly as it
was created in the Medium image file name field.
Note: The
file name must match exactly. The case and extension must be exact.
Click Save to save the record.
If the image is found, it will appear immediately
as a small icon to the right of the entry field. Click the icon to open
the window to display the image.
Price Regulation
Depending on your marketplace, a supplier can update an item’s price
as often as is necessary (once per day as a minimum). However, the price
will need to be approved if your company is price regulated.